Gateway API, cert-manager and Let's Encrypt.
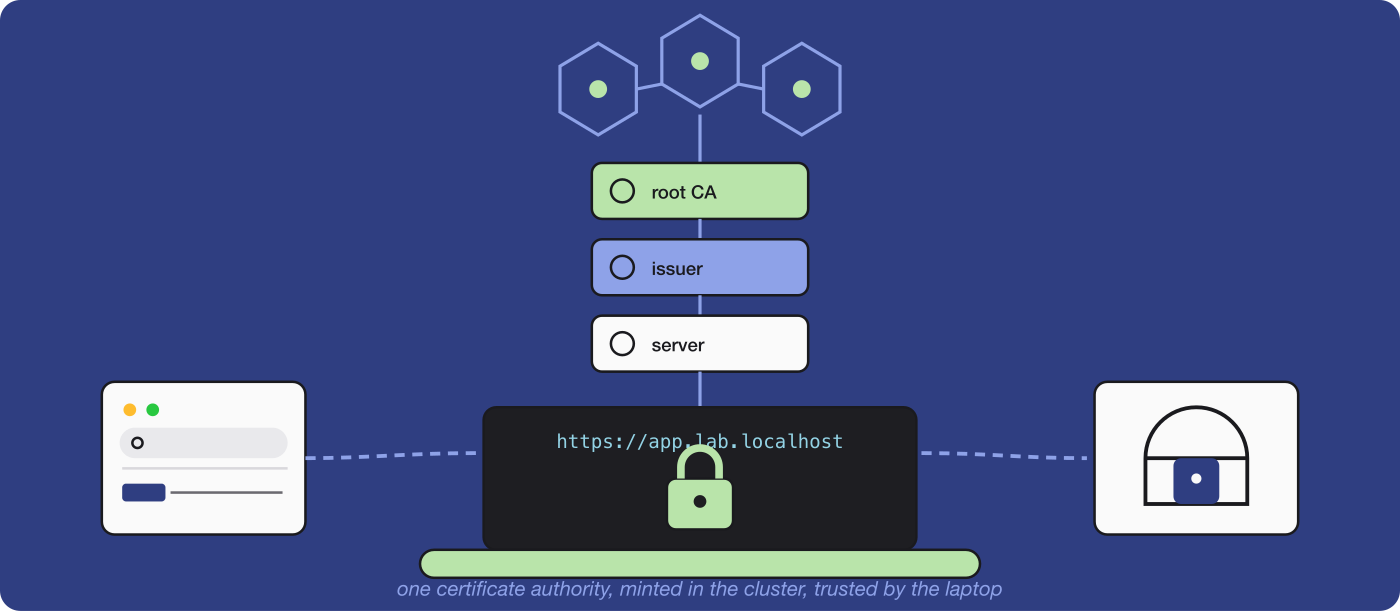
I'm fairly new to cloud native and one thing caught me out early, almost everything I deploy ends up behind an encrypted HTTP port yet my development environment only listens on plain old http://localhost. Production was shipped with TLS by default and my local environment was configured to only listen on localhost and that gap lead to a lot of confusing bugs.
Some of the bugs such as cookies marked Secure but behave differently were easily noticeable in the browser. Several browser features were also disabled by default without HTTPS. These security errors only exist in the development environment because the state of the cluster and everything else appeared to be up and running despite the apparent browser-side failure. I'd rather spend my time debugging the application itself than constantly having to debug the infrastructure it relies on, so I started looking into how to configure real TLS in my lab cluster too.
While looking for a good guide, I found Rob Thorne's 2021 Medium article, Adventures in Encryption: Securing Your Laptop Kubernetes Cluster. The idea hasn't aged a day: make your own certificate authority, trust it and let cert-manager issue certificates for you. The tools around it have aged though. This post is my update of that article for 2026 with credit to Rob for the original approach. Part I covers a local cluster, and Part II takes the same ideas to a public cluster with free Let's Encrypt certificates.
So what really changed? The extensions/v1beta1 Ingress in the original was removed in Kubernetes 1.22, so those manifests won't apply on a current cluster. Additionally, the Ingress NGINX controller it relied on was retired earlier in March this year (the final release was v1.15.1 and the repository is archived). This version uses the Gateway API, the modern replacement for Ingress, plus a few newer tools that make the certificate side easier.
Before We Begin
A little heads up: I'm still learning myself, so I'm assuming you've at least have some fair knowledge with certificates, Kubernetes and Helm.
Other prerequisites are:
- You should be familiar with Kubernetes and Docker, and be comfortable installing a few tools on your own machine.
- I'll cover PKI and X.509 quickly, so it helps if you know roughly what a key and a certificate are.
- You should understand that a certificate authority is just a certificate that's allowed to sign other certificates, and that whoever holds its private key can mint certificates for any name it's trusted for.
The CA key is the master key to the building. Don't leave it under the doormat.
For Part I we'll setup our own certificate authority (CA) and let cert-manager use it to issue server certificates automatically. Browsers and tools only trust certificates signed by an authority they know, and no public authority will sign a certificate for a product still in early development that only exists on your laptop. That is why we are configuring our CA to bypass the browser errors and also simulate the secure-first deployment approach embedded in Kubernetes.
My HomeLab Setup and What You'll Need
Everything here works on Linux, Windows or macOS. For reference, I'm on a Mac with Colima providing Docker and a single-node kind cluster. Here's the full list:
- Docker running (Colima, Docker Desktop or plain Docker Engine).
- kind (Kubernetes in Docker) for the cluster. minikube and k3d work too
- kubectl and Helm.
- Envoy Gateway, one of several controllers that implement the Gateway API. It does the job Ingress NGINX used to do: your apps run on whatever ports they like and the outside world sees HTTPS on 443.
- cert-manager, the part that does the heavy lifting. Once we describe what we want, it creates and renews the certificates for us.
- trust-manager, optional (see the bonus section). A cert-manager sub-project that hands your CA to the pods in your cluster.
If you haven't set up a local cluster yet, this guide walks you through creating one. NOTE: Envoy Gateway and cert-manager are extra controllers on top of Kubernetes itself, so on a small machine give Docker a bit more memory than you think you need. And if you keep other clusters' containers around, stop the ones you aren't using (see When Things Go Wrong for the timeout story).
kind create cluster --name lab
Next, Envoy Gateway. Its Helm chart installs the Gateway API definitions too. Pinned to the version I verified; check the Envoy Gateway releases for anything newer:
helm install eg oci://docker.io/envoyproxy/gateway-helm --version v1.10.0 -n envoy-gateway-system --create-namespace
kubectl wait --timeout=5m -n envoy-gateway-system deployment/envoy-gateway --for=condition=Available
The cert-manager. Gateway API support is opt-in, so save this as cm-values.yaml first:
crds:
  enabled: true
config:
  apiVersion: controller.config.cert-manager.io/v1alpha1
  kind: ControllerConfiguration
  gatewayAPI:
    enabled: true
Then install it from the OCI chart, pinned to the version I verified and current at time of writing:
helm install cert-manager oci://quay.io/jetstack/charts/cert-manager --version v1.21.3 -n cert-manager --create-namespace -f cm-values.yaml
A version note: older cert-manager charts used a top-level enableGatewayAPI: true in the values. That key is still accepted for compatibility, but it's deprecated as of v1.21. The gatewayAPI.enabled shape above is the current one. I verified this by running the exact values file against v1.21.3 and confirmed the controller came up reading gatewayAPI.enabled: true from its config.
It is also worth noting that order matters a little here. Installing Envoy Gateway first means the Gateway API definitions already exist by the time cert-manager starts. If you ever install the Gateway API definitions after cert-manager is running, restart the cert-manager deployment so it notices them.
Creating the CA
The old way to make a CA was a long openssl config file which contains a passphrase that decrypts the key into a temporary file and uploads it to the cluster. This setup works under the assumption that you would remember to delete the temp file after usage. It works, but there are plenty of ways to slip up.
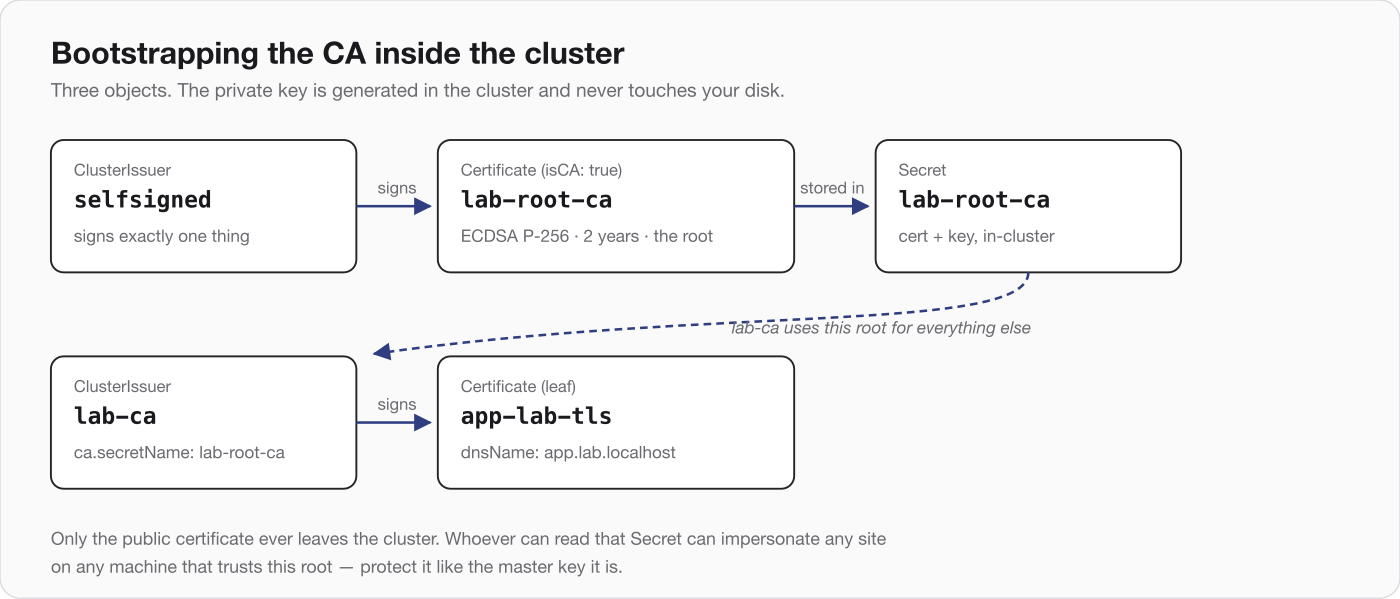
A much preferred approach is to configure the cert-manager to bootstrap the CA itself. The private key is generated inside the cluster and never touches your disk. There are three links in the chain:
- A self-signed issuer, whose only job is to sign one certificate.
- A CA certificate, signed by that issuer, marked
isCA: true. This is our root. - A CA issuer, which uses that root to sign everything else.
Save this as ca.yaml:
apiVersion: cert-manager.io/v1
kind: ClusterIssuer
metadata:
  name: selfsigned
spec:
  selfSigned: {}
---
apiVersion: cert-manager.io/v1
kind: Certificate
metadata:
  name: lab-root-ca
  namespace: cert-manager
spec:
  isCA: true
  commonName: Lab Root CA
  secretName: lab-root-ca
  duration: 17520h
  privateKey:
    algorithm: ECDSA
    size: 256
  issuerRef:
    name: selfsigned
    kind: ClusterIssuer
---
apiVersion: cert-manager.io/v1
kind: ClusterIssuer
metadata:
  name: lab-ca
spec:
  ca:
    secretName: lab-root-ca
kubectl apply -f ca.yaml
kubectl get certificate -n cert-manager lab-root-ca
When READY says True, you have a CA. In my run it took two seconds. A few notes on the choices:
- I picked an ECDSA P-256 key. It's smaller and faster than the 4096-bit RSA key the original used and every current browser accepts it.
- It's a
ClusterIssuer, not a namespacedIssuerso any namespace can use it. - The root lasts two years, which is fine for a lab. A real internal CA would use a short-lived intermediate and keep the root offline.
- Anyone with this CA key can impersonate any site to any machine that trusts the CA. Protect the cluster's secrets, and only trust this root on machines you control.
Trusting the CA
A CA only helps if your computer trusts it. Pull the public certificate out of the cluster. Only the certificate leaves, never the key:
kubectl get secret lab-root-ca -n cert-manager -o jsonpath='{.data.tls\.crt}' | base64 -d > lab-root-ca.crt
Then add it to your system trust store:
# macOS, system-wide
sudo security add-trusted-cert -d -r trustRoot -k /Library/Keychains/System.keychain lab-root-ca.crt

# macOS, just for your user (no sudo needed; this is how I verified this post)
security add-trusted-cert -r trustRoot -k ~/Library/Keychains/login.keychain-db lab-root-ca.crt

# Debian / Ubuntu
sudo cp lab-root-ca.crt /usr/local/share/ca-certificates/lab-root-ca.crt
sudo update-ca-certificates

# Windows (administrator prompt)
certutil -addstore -f ROOT lab-root-ca.crt
The login-keychain variant does the same job without needing admin rights: same trust decision, smaller blast radius and easy to undo from Keychain Access. Chrome, Edge and Safari use the system store. Firefox keeps its own, so either import the certificate in its settings or turn on security.enterprise_roots.enabled in about:config so it reads the system store.
A shortcut worth knowing about is mkcert, a tool that creates a local CA and installs it in your system and browser trust stores with one command. If all you need is HTTPS for a dev server on your laptop, it's the quickest route and you can even load its root into the cluster as a TLS secret and point the CA issuer at it. I'm doing the in-cluster version here because it teaches you how cert-manager thinks and it's the same machinery you'll use in Part II.
Configuring Kubernetes and the Gateway API
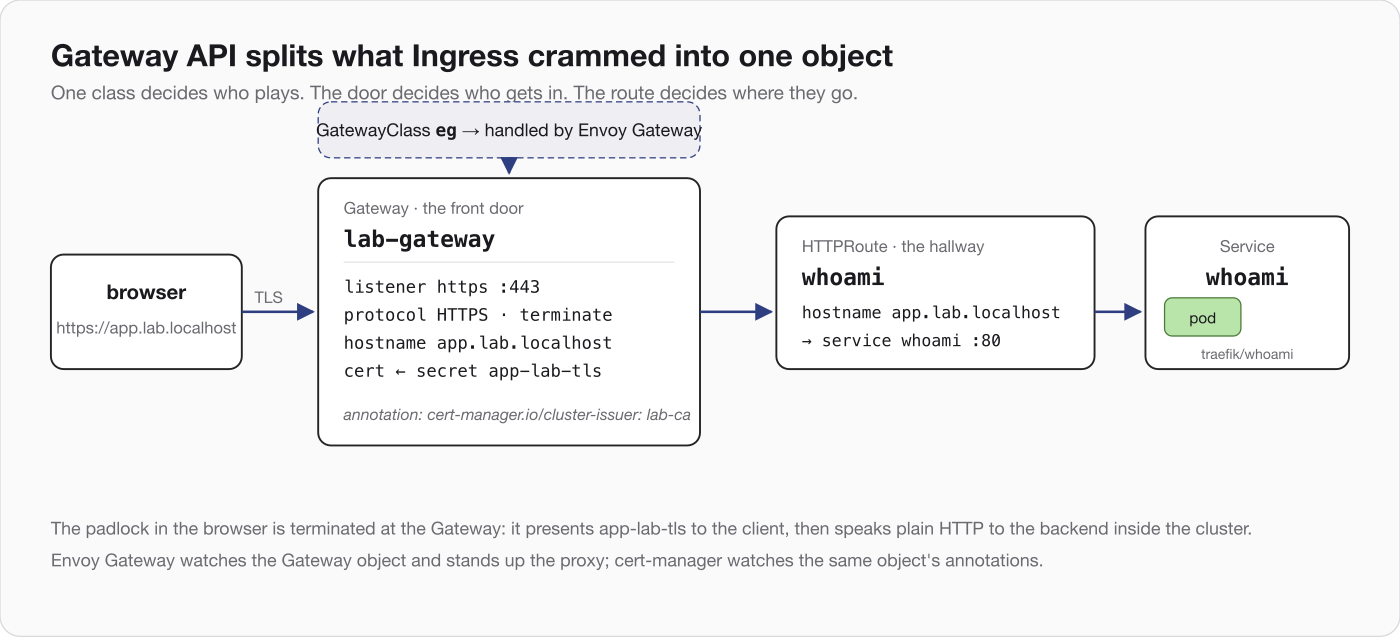
Quick vocabulary first, because the Gateway API splits up what Ingress crammed into one object:
- A GatewayClass says which controller handles traffic (here, Envoy Gateway).
- A Gateway is the front door: which ports and hostnames are open and which certificate each uses.
- An HTTPRoute says where requests go once they are through the door.
First, a name for the site. The original edited /etc/hosts. I use app.lab.localhost instead: browsers and most tools resolve anything ending in .localhost to your own machine, so there's nothing to edit. If yours doesn't, add 127.0.0.1 app.lab.localhost to /etc/hosts.
Save this as app.yaml. It has a tiny demo app, the front door and the route. The one line that brings cert-manager in is the cert-manager.io/cluster-issuer annotation on the Gateway.
apiVersion: apps/v1
kind: Deployment
metadata:
  name: whoami
spec:
  replicas: 1
  selector:
    matchLabels:
      app: whoami
  template:
    metadata:
      labels:
        app: whoami
    spec:
      containers:
        - name: whoami
          image: traefik/whoami
          ports:
            - containerPort: 80
---
apiVersion: v1
kind: Service
metadata:
  name: whoami
spec:
  selector:
    app: whoami
  ports:
    - port: 80
      targetPort: 80
---
apiVersion: gateway.networking.k8s.io/v1
kind: GatewayClass
metadata:
  name: eg
spec:
  controllerName: gateway.envoyproxy.io/gatewayclass-controller
---
apiVersion: gateway.networking.k8s.io/v1
kind: Gateway
metadata:
  name: lab-gateway
  annotations:
    cert-manager.io/cluster-issuer: lab-ca
spec:
  gatewayClassName: eg
  listeners:
    - name: https
      protocol: HTTPS
      port: 443
      hostname: app.lab.localhost
      tls:
        mode: Terminate
        certificateRefs:
          - name: app-lab-tls
      allowedRoutes:
        namespaces:
          from: Same
---
apiVersion: gateway.networking.k8s.io/v1
kind: HTTPRoute
metadata:
  name: whoami
spec:
  parentRefs:
    - name: lab-gateway
  hostnames:
    - app.lab.localhost
  rules:
    - backendRefs:
        - name: whoami
          port: 80
(Pin the image to a specific version for anything you care about.)
kubectl apply -f app.yaml
kubectl get gateway lab-gateway
kubectl get certificate
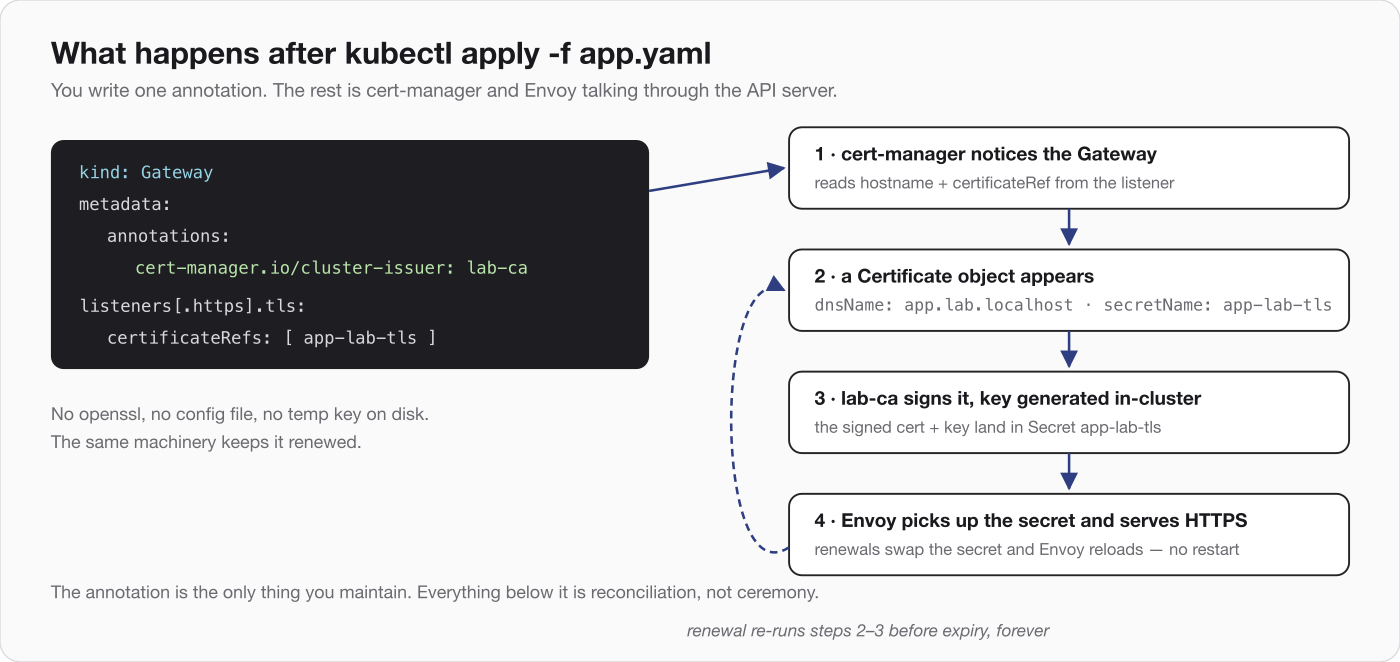
Within seconds cert-manager notices the annotation, sees that the listener names a secret called app-lab-tls then creates a Certificate for app.lab.localhost, signs it with our CA and stores the result in that secret. No openssl involved at all.
Two things also worth knowing here:
- The leaf certificate comes out RSA-2048 with a 90-day lifetime, even though the root is ECDSA. The issuer doesn't pass its own key type down. If you want the leaf to match, annotate the Gateway with
cert-manager.io/private-key-algorithm: ECDSA(andcert-manager.io/private-key-size: 256). The cert-manager annotation reference lists everything the shim accepts this way. Either setting renews automatically. 90 days sounds short until you remember nobody has to touch it. - On kind,
kubectl get gatewaywill show an empty ADDRESS andProgrammed: Falsewith reasonAddressNotAssigned. That's expected, not broken: kind has no LoadBalancer to hand the proxy a real address. The certificate still gets issued and the port-forward below works fine.
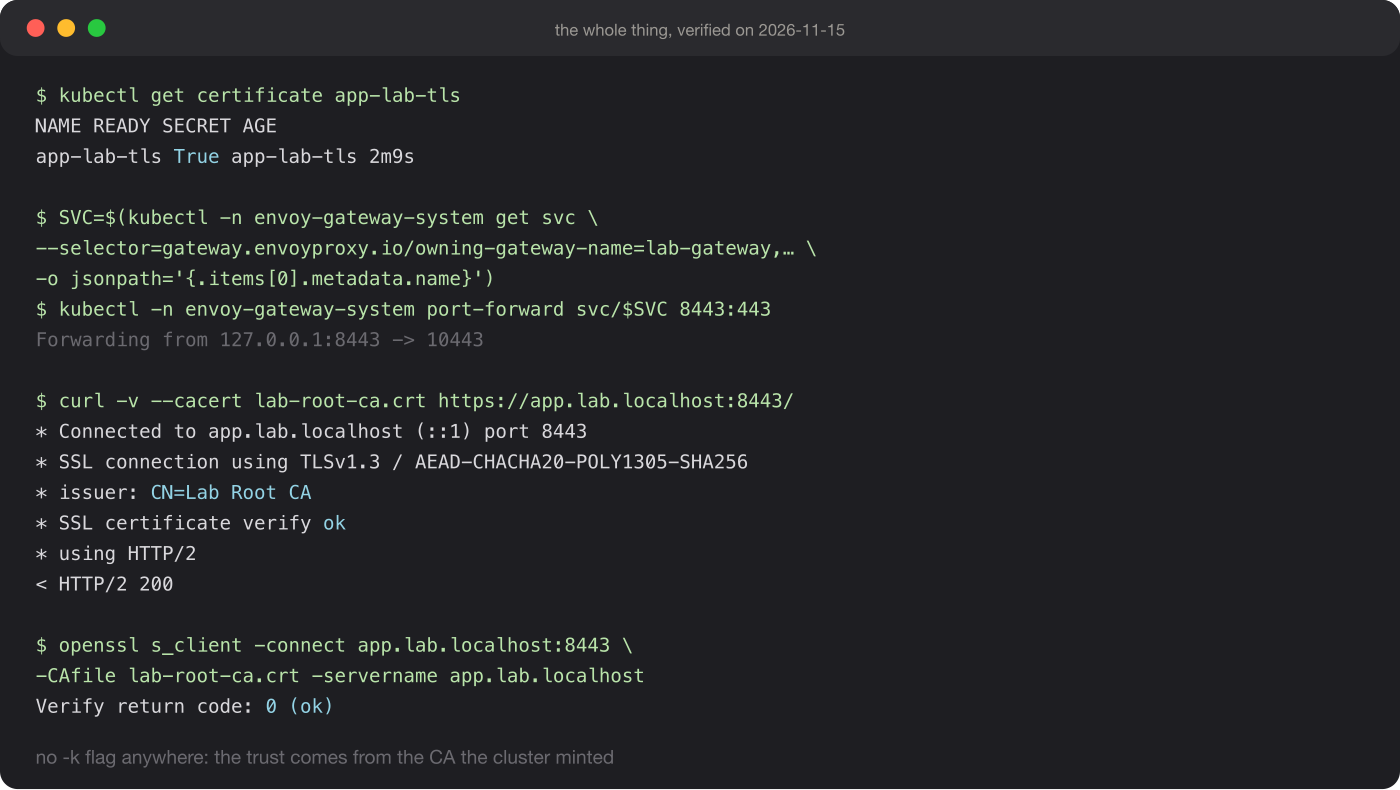
Now to reach it. On kind, the simplest way from your laptop is a port-forward to the proxy Envoy Gateway created for our Gateway:
SVC=$(kubectl -n envoy-gateway-system get svc --selector=gateway.envoyproxy.io/owning-gateway-name=lab-gateway,gateway.envoyproxy.io/owning-gateway-namespace=default -o jsonpath='{.items[0].metadata.name}')
kubectl -n envoy-gateway-system port-forward svc/$SVC 8443:443
Leave that running, and in another terminal:
curl --cacert lab-root-ca.crt https://app.lab.localhost:8443/
Once the CA is in your keychain you can even drop --cacert: your system trust does the job, which is the whole point of Part I.
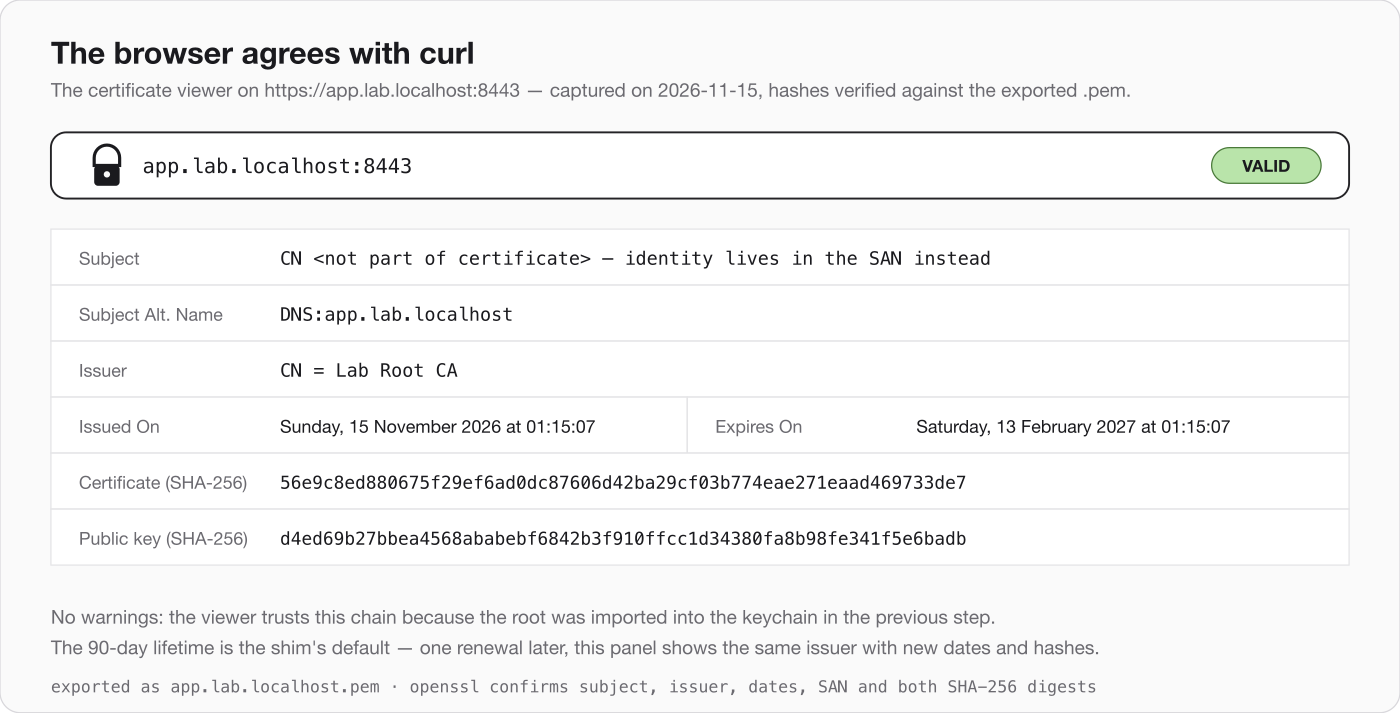
Or just browse to https://app.lab.localhost:8443. Look at the certificate and you'll see it was issued by "Lab Root CA". Chrome and Safari should be happy with it, and Firefox will be once it knows about the CA. Your local cluster is now serving HTTPS.
If you want plain https://app.lab.localhost on port 443 with no forwarding, you need a way to give the proxy a real address on your machine. Options include a fixed NodePort plus a kind port mapping set when the cluster is created, MetalLB, or the cloud-provider-kind helper. Any of them works, the certificate side doesn't change.
Bonus: Teaching Pods to Trust the CA
Your laptop trusts the CA now but the pods in your cluster don't. If a CI runner, a registry client or one of your own services calls another service over HTTPS, it will complain about an unknown authority. Baking the CA into every image works but there's a tidier way.
trust-manager takes certificates from sources you choose and publishes them as a bundle in every namespace. Install it next to cert-manager:
helm install trust-manager oci://quay.io/jetstack/charts/trust-manager --version v0.26.0 -n cert-manager --wait
Then describe the bundle: the usual public CAs plus our lab root.
apiVersion: trust.cert-manager.io/v1alpha1
kind: Bundle
metadata:
  name: lab-ca-bundle
spec:
  sources:
    - useDefaultCAs: true
    - secret:
        name: lab-root-ca
        key: tls.crt
  target:
    configMap:
      key: ca-bundle.crt
Every namespace now gets a ConfigMap called lab-ca-bundle that you can mount into any pod that needs to trust both the public internet and your lab. In my run it landed in all namespaces within seconds with 149 certificates including the Lab Root CA.
Part II: Let's Encrypt for Your Public Cluster
Part I gave us certificates that only our own machines believe. Part II is about certificates that every browser believes for free from Let's Encrypt.
The good news is that there's very little new to learn. A public authority is just another kind of issuer. Instead of a ca block pointing at a secret, the issuer describes an ACME account and a way to prove you control the domain and cert-manager does the rest.
Assumptions and Prerequisites for Part II
- You own a domain and can edit its DNS records.
- You have a cluster that is reachable from the internet such as a small VPS running k3s or a managed Kubernetes service with ports 80 and 443 open to the world. A laptop cluster behind home internet usually isn't. There is a trick for that near the end.
- Envoy Gateway and cert-manager are installed the same way as in Part I, with
gatewayAPI.enabled: truein the cert-manager values. - The Gateway's proxy has a public address. On a managed cluster this is a LoadBalancer address. On a VPS with k3s, its built-in service load balancer usually does the job.
- Your DNS has an
Arecord pointingshop.yourdomain.comat that address. Replaceyourdomain.comeverywhere below with your real domain.
Let's Encrypt has rate limits and it's easy to hit them while you're still fumbling. Use staging first.
Staging First
Let's Encrypt runs a staging service that works exactly like the real one but issues certificates browsers don't trust, and has far more generous limits. Always debug there. Only when everything is green do you switch to production.
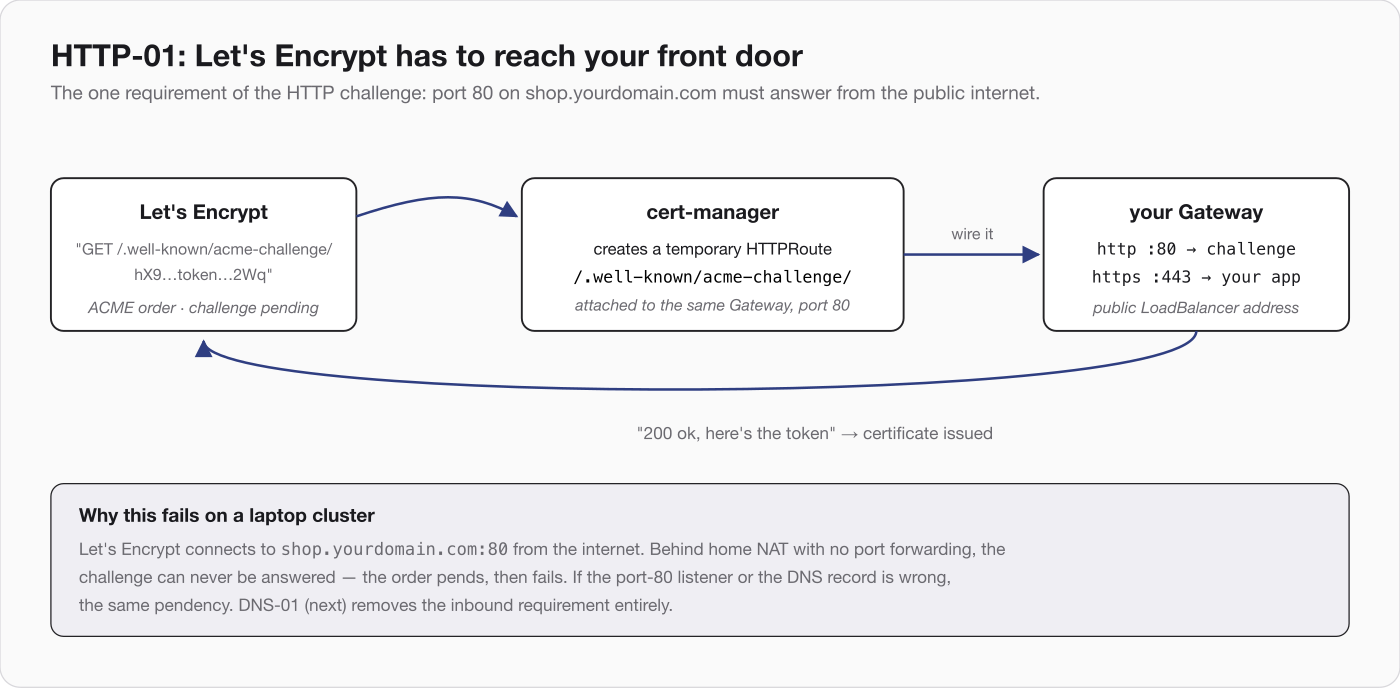
To prove we own the domain we use the HTTP-01 challenge: Let's Encrypt asks for a specific file at http://shop.yourdomain.com/.well-known/acme-challenge/.... With the Gateway API, cert-manager answers by creating a temporary HTTPRoute attached to our Gateway. For that to work the Gateway must have a plain HTTP listener on port 80, and the issuer must say which Gateway to use.
Save this as issuer-staging.yaml:
apiVersion: cert-manager.io/v1
kind: ClusterIssuer
metadata:
  name: letsencrypt-staging
spec:
  acme:
    server: https://acme-staging-v02.api.letsencrypt.org/directory
    email: you@yourdomain.com
    privateKeySecretRef:
      name: letsencrypt-staging-account-key
    solvers:
      - http01:
          gatewayHTTPRoute:
            parentRefs:
              - kind: Gateway
                name: public-gateway
                namespace: default
The email is where Let's Encrypt sends warnings if something goes wrong with renewal, so use one you read.
Now the public front door. Compare it to the lab Gateway: same shape, different issuer, plus the port 80 listener:
apiVersion: gateway.networking.k8s.io/v1
kind: Gateway
metadata:
  name: public-gateway
  annotations:
    cert-manager.io/cluster-issuer: letsencrypt-staging
spec:
  gatewayClassName: eg
  listeners:
    - name: http
      protocol: HTTP
      port: 80
      hostname: shop.yourdomain.com
      allowedRoutes:
        namespaces:
          from: Same
    - name: https
      protocol: HTTPS
      port: 443
      hostname: shop.yourdomain.com
      tls:
        mode: Terminate
        certificateRefs:
          - name: shop-tls
      allowedRoutes:
        namespaces:
          from: Same
Point an HTTPRoute at your app on the https listener exactly as in Part I (use sectionName: https in the parentRefs), apply everything and watch:
kubectl apply -f issuer-staging.yaml -f public-gateway.yaml
kubectl get certificate -w
When the certificate says READY: True, fetch the site with curl -k (the -k is needed because browsers and curl don't trust the staging authority) and look at the issuer. It should say something like "(STAGING)".
Going to Production
Copy the issuer, rename it letsencrypt-prod and change the server to https://acme-v02.api.letsencrypt.org/directory (and the account key secret name to something new). Then change the annotation on the Gateway to the new issuer, and delete the old staging secret so a fresh certificate is requested:
kubectl delete secret shop-tls
Check again with kubectl get certificate, then load the site in a browser. A padlock with no warnings means you're done. Renewal is automatic: cert-manager renews well before expiry and swaps the secret and Envoy picks up the new certificate without a restart. Certificate lifetimes are trending shorter across the industry: the CA/Browser Forum's current plan shrinks maximum TLS lifetimes to 47 days by 2029, so automation like this stops being a convenience and becomes the only sane way to run TLS.
Don't Forget the Redirect
Anyone typing your domain without https:// lands on port 80. Send them to the secure site with a redirect route on the HTTP listener:
apiVersion: gateway.networking.k8s.io/v1
kind: HTTPRoute
metadata:
  name: http-to-https
spec:
  parentRefs:
    - name: public-gateway
      sectionName: http
  hostnames:
    - shop.yourdomain.com
  rules:
    - filters:
        - type: RequestRedirect
          requestRedirect:
            scheme: https
            statusCode: 301
This doesn't get in the way of certificate issuance. The temporary challenge route cert-manager creates matches a more specific path, so it wins over your catch-all redirect.
Wildcards and the DNS-01 Challenge
HTTP-01 has two limits: it needs the site to be reachable from the internet, and it can't issue wildcard certificates such as *.yourdomain.com. For wildcards, you use DNS-01 instead. Let's Encrypt asks you to publish a special TXT record, and cert-manager does that for you through your DNS provider's API. Providers like Cloudflare, Route 53 and Google Cloud DNS are supported out of the box.
A Cloudflare example. Create an API token limited to DNS edits for just your zone, and store it:
kubectl create secret generic cloudflare-api-token -n cert-manager --from-literal=api-token=<your-token>
Then an issuer that uses it:
apiVersion: cert-manager.io/v1
kind: ClusterIssuer
metadata:
  name: letsencrypt-dns
spec:
  acme:
    server: https://acme-v02.api.letsencrypt.org/directory
    email: you@yourdomain.com
    privateKeySecretRef:
      name: letsencrypt-dns-account-key
    solvers:
      - dns01:
          cloudflare:
            apiTokenSecretRef:
              name: cloudflare-api-token
              key: api-token
For a wildcard it's clearest to request the certificate yourself rather than through the Gateway annotation:
apiVersion: cert-manager.io/v1
kind: Certificate
metadata:
  name: lab-wildcard
spec:
  secretName: lab-wildcard-tls
  dnsNames:
    - '*.lab.yourdomain.com'
  issuerRef:
    name: letsencrypt-dns
    kind: ClusterIssuer
Then reference lab-wildcard-tls in a Gateway listener whose hostname is *.lab.yourdomain.com. Treat that API token like a password: it can change your DNS. Use the narrowest scope your provider allows and keep it out of Git.
Plot Twist: Real Certificates for Your Laptop Cluster
Here's the trick I promised. DNS-01 never needs to reach your server, only your DNS provider. That means you can get a certificate from Let's Encrypt for a cluster that isn't on the internet at all.
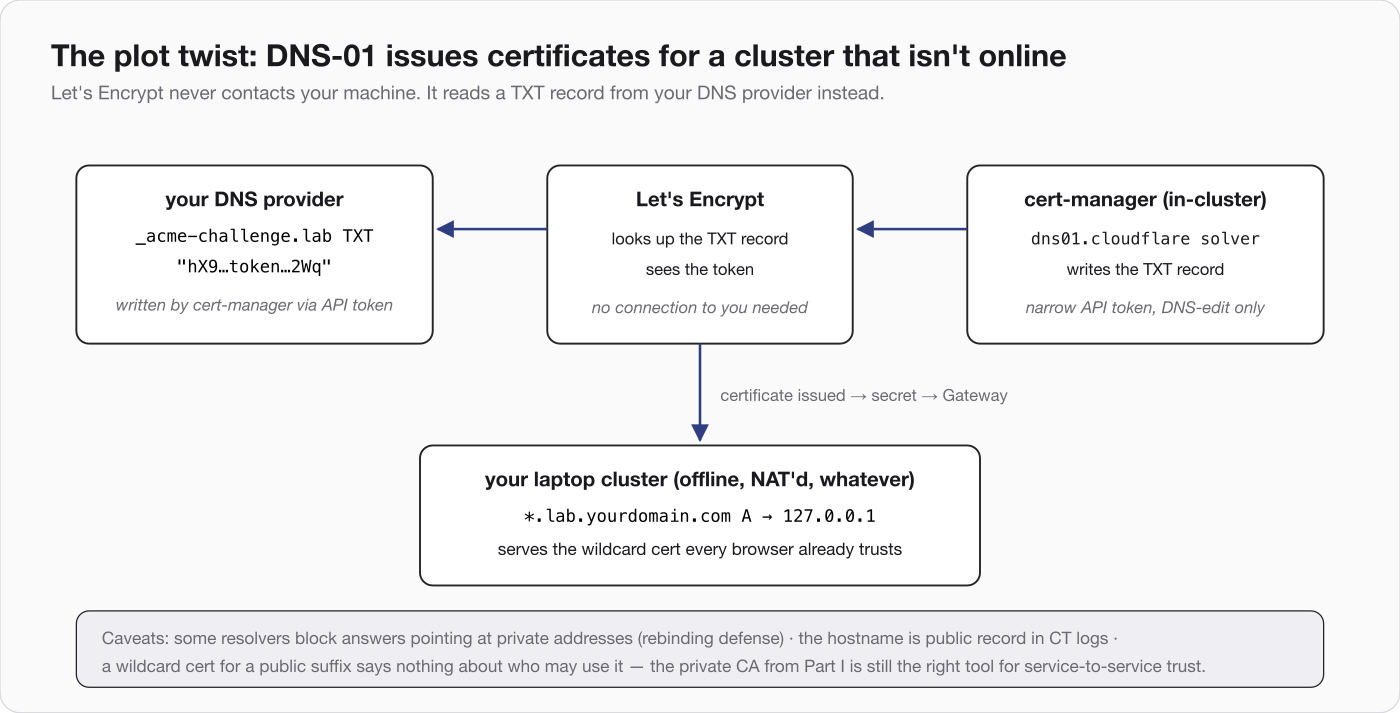
Publish a wildcard A record such as *.lab.yourdomain.com pointing to 127.0.0.1 (or a private address on your network). Issue the wildcard certificate above. Now your laptop cluster serves a certificate every browser already trusts, on real hostnames and there is no CA to import on any device. Phones and teammates' machines just work.
The catch: some routers and DNS resolvers block answers that point to private addresses, a protection called DNS rebinding defense. If names don't resolve, that's the likely cause. And be careful what you put on such a certificate, because a certificate for a public hostname is public record in Certificate Transparency logs.
It's still worth building the private CA from Part I. It teaches you what is really going on, it works with no internet or domain at all, and it's the right tool for things like service-to-service traffic inside the cluster.
When Things Go Wrong
Certificates fail in boring, traceable ways. cert-manager leaves a trail of objects, and you follow it from the outside in:
kubectl describe certificate shop-tls
kubectl get certificaterequest,order,challenge
kubectl describe challenge
The usual suspects:
- A challenge stuck pending. For HTTP-01, check that DNS points at the right address, that port 80 is really open from the internet, and that the Gateway has an HTTP listener. For DNS-01, check the API token's permissions and the cert-manager logs.
- The Gateway has an annotation but no Certificate appears. cert-manager probably isn't watching the Gateway API. Confirm
gatewayAPI.enabled: trueis in the values the controller actually reads (kubectl -n cert-manager get cm cert-manager -o jsonpath='{.data.config\.yaml}') and restart cert-manager if the Gateway API definitions were installed after it. - Browser warnings with a certificate that was issued. You're probably still on the staging issuer.
- Rate limits. If you've hit one, wait and go back to staging while you debug.
Where to Go From Here
On your laptop, cert-manager runs its own CA and gives every service a certificate from a single annotation. In public, the same machinery asks Let's Encrypt instead and renews automatically. It's the same model both times: an issuer, a certificate, a secret and a front door that uses it.
Next on my own list: keeping the manifests and issuers in Git with Argo CD, encrypting secrets like the DNS token with SOPS or an external secrets operator, and mutual TLS between services. Those are for another post.
Until then, keep your keys private and your certificates renewing. If something in here breaks on your setup, let me know. Breaking things is how I learn.
This post is an update of "Adventures in Encryption: Securing Your Laptop Kubernetes Cluster" by Rob Thorne (Medium, 2021).